
들어가며
장고 Form 클래스는 HTML form과 관련된 태그들을 생성하고 웹 애플리케이션에서 해당 데이터를 처리하는 편리한 방법을 제공해줍니다.
사용자가 귀찮게 반복해서 작성해야 하는 HTML form 태그 부분을 장고에서 지원해 주는 거죠.
유효성 검사, 오류 처리 및 데이터 조작 기능까지 Form 클래스로 구현하게 해준다니, 이 편리한 기능에 대해 공부한 내용을 정리해보았습니다.
기본 장고 Form 사용법
app 디렉토리 하위에 forms.py를 생성해줍니다.
Form 클래스를 사용하기 위해서는 forms.Form 을 상속 받은 클래스를 만들어줘서 사용할 수 있습니다.
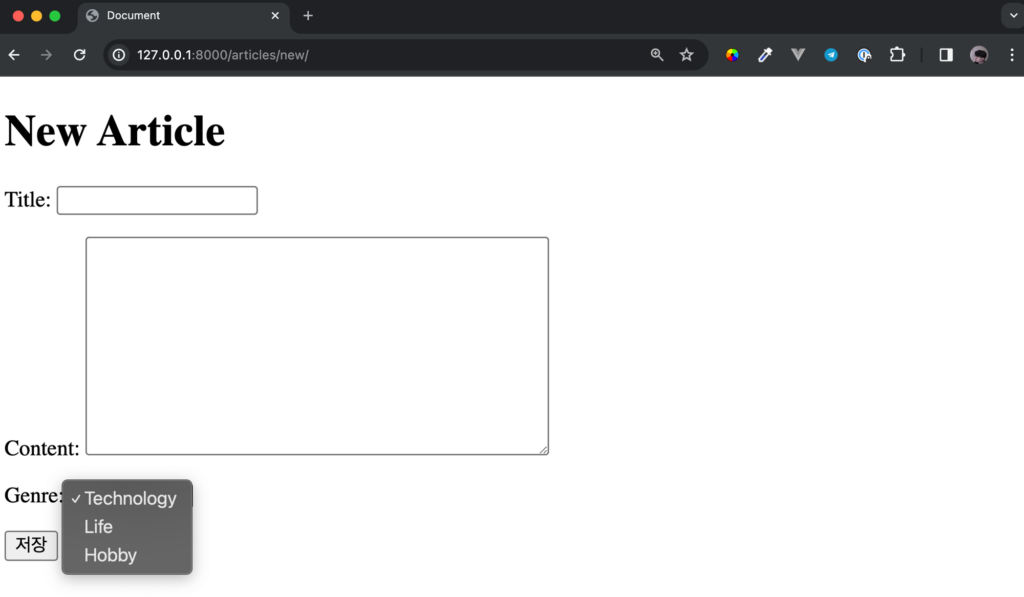
widget 속성을 이용해서 input 태그 속성을 변경할 수 있습니다. widget=forms.Textarea 옵션으로 HTML의 <textarea> 태그를 구현해준다고 볼 수 있습니다.
choice 속성은 [(실제 값, 화면에 나타나는 값), (,) , …] 형태의 리스트를 받아서 드랍 다운 폼을 만들어 줍니다.
app/forms.py
from django import forms

class ArticleForm(forms.Form):
    # 앞은 데이터베이스에 저장될 값, 뒤는 사용자에게 보여질 값
    GENRE_CHOICES = [
        ("technology", "Technology"),
        ("life", "Life"),
        ("hobby", "Hobby"),
    ]

    title = forms.CharField(max_length=10)
    # wiget을 forms.Textarea로 하면 textarea 태그가 만들어짐
    content = forms.CharField(widget=forms.Textarea)
    genre = forms.ChoiceField(choices=GENRE_CHOICES)
view에서는 context로 form 정보를 context에 끼워서 template에 보냅니다.
app/views.py
from.forms import ArticleForm
...
def new(request):
        form = ArticleForm()
        context = {
                "form": form,
        }
        return render(request, "new.html", context)
...
template에서는 form에서 받은 정보를 as_p 혹은 as_div로 받습니다.
“as_p는 p태그로 받는다, as_div는 div 태그로 받는다”를 의미인데요. 이런 옵션을 랜더링 옵션이라고 합니다.
rendering option 종류
| Rendering option | 설명 | HTML 출력 |
|---|---|---|
{{ form.as_div }} | <div> 태그로 묶인 양식 요소를 렌더링합니다. | <div> 태그 |
{{ form.as_table }} | 양식 요소를 <tr> 태그의 테이블 셀로 렌더링합니다. | <tr> 및 <td> 태그가 있는 테이블 구조 |
{{ form.as_p }} | <p> 태그로 묶인 양식 요소를 렌더링합니다. | <p> 태그 |
{{ form.as_ul }} | <li> 태그로 묶인 양식 요소를 렌더링합니다. | <li> 태그가 있는 <ul> 구조 |
{{ form.as_table }} 또는 {{ form.as_ul }}를 각각 사용할 때 주변 <table> 또는 <ul> 요소를 직접 제공해야 한다는 점에 유의합니다 |
app/new.html
...
{{ form.as_p }}
...
브라우저
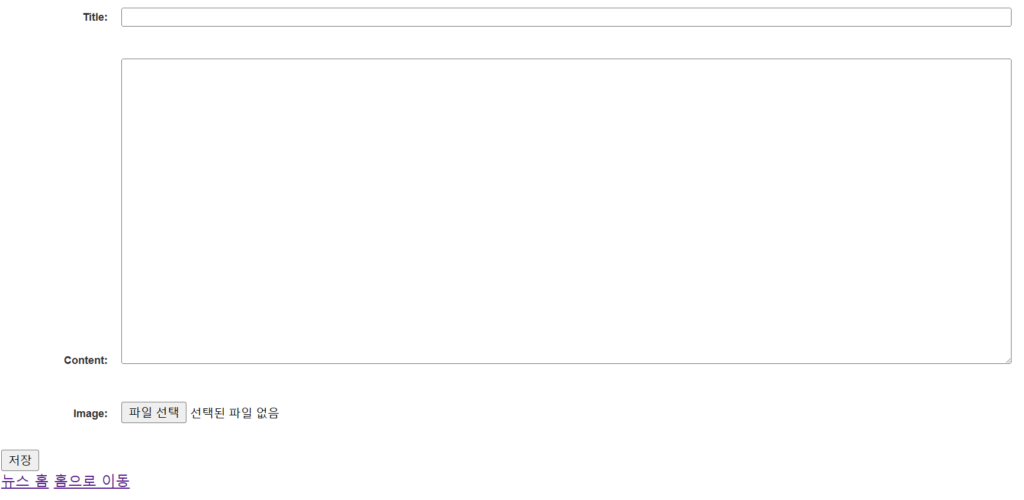
form 태그 스타일 수정하기
template에서 {{ form.as_p }}가 포함된 form 태그가 아래와 같을 때도 style은 동일하게 변경해줄 수 있습니다.
<form action="{% url "articles:create" %}" method="POST">
    {% csrf_token %}
    {{ form.as_p }}
    <button type='submit'>저장</button>
</form>
해당 방법은 static 파일을 이용하는 법을 알아야 적용할 수 있는데요.
간단하게 말씀드려서 static 디렉토리에 다음과 같은 CSS 파일을 작성하고 template에 다음과 같이 작성하면 template의 스타일도 변경할 수 있습니다.
{% comment %} head.html or base.html에 아래 코드 추가 {% endcomment %}
{% laod static %}
<link rel="stylesheet" href="{% static 'your_css.css' %}">
아래와 같이 간단하게 CSS 파일을 추가해보겠습니다.
/* Target all <p> elements within the form */
form p {
    /* Apply custom styles */
    margin-bottom: 10px; /* Add some margin between form elements */
}

/* Target specific form elements by class or ID */
form input[type="text"] {
    /* Apply custom styles */
    width: 70%; /* Make text input fields full width */
}

form textarea {
    /* Apply custom styles */
    width: 70%; /* Make textareas full width */
    height: 40%; /* Set a specific height for textareas */
}

form label {
    font-family: Arial, sans-serif;
    font-size: 12px;
    font-weight: bold;
    color: #333333;
    text-align: right;
    padding: 5px 10px;
    margin-bottom: 20px;
    display: inline-block;
    width: 110px;
    line-height: 10px;
}
브라우저
위와 다르게 이미지 업로드도 추가하는 작업도 수행해서 내용이 조금 다르지만 스타일이 달라진 것에만 주목해주세요…!
Model Form Class
앞서서는 form.Form을 상속 받아서 From 클래스를 만들었지만 Form 클래스는 사실 우리가 만들어진 Model과 굉장히 유사하다는 것을 알 수 있습니다.
이런 점을 이용해서 장고는 Model 구조를 보고 알아서 Form을 만들어주는 기능을 탑재하고 있습니다…
이전처럼 forms.Form이 아닌 forms.ModeslForm을 상속 받아서 Form 클래스를 작성해 줍니다.
해당 Form이 어떤 모델을 상속 받을지 알려주기 위해 class Meta를 작성해줘야 합니다.
- model = 모델 이름
- field = form에 포함 시킬 모델의 필드명
- “__all__” : 모든 필드 사용
- [필드명, …] : 특정 필드만 사용할 때 리스트 사용
- exclude = [필드명,…] : 모델에는 있지만 Form에서 제외할 필드명
Note : auto_new? auto_new_add? 에 해당하는 필드는 자동으로 값이 채워지기 때문에 exclude 하지 않아도 알아서 처리됩니다.
app/forms.py
from django import forms

from articles.models import Article


class ArticleForm(forms.ModelForm):
    class Meta:
        model = Article
        fields = "__all__"
        # fields = ["title", "content"]
        # exclude = ["title"]
Model form을 사용하게 되면 유효성 검사와 같은 기능을 간단하게 구현할 수 있습니다.
app/views.py – create view (기존)
def create(request):
    if request.method == 'POST':
        title = request.POST.get("title")
        content = request.POST.get("content")
        article = Articles.objects.create(
            title=title, content=content)
        return redirect("article_details", article.id)
app/views.py – create view (변경)
ArticleForm(request.POST)- 만들어준 model form인 ArticleForm을 사용
request.POST을 통해서 POST 요청으로 받은 데이터를 받음
if form.is_valid()을 통해서 입력 받은 form 데이터의 유효성 검사form.save()을 통해서 모델에 데이터 저장
from .forms import ArticleForm

...
def create(request):
  form = ArticleForm(request.POST) # form에 request.POST에 있는 데이터 채워
  if form.is_valid(): # form 형식에 맞으면
      article = form.save() # 저장하고 해당 객체 반환까지 동시에 가능
      return redirect("article_detail", article.id)
  return redirect("new")
...
마치며
Form 클래스를 사용하면 유효성 검사, 데이터 전달, 저장 등을 굉장히 간단하게 수행할 수 있음을 알 수 있었습니다.
그런데 간단하다는 건 반대로 복잡한 조작을 할 수 없지 않을까? 하는 걱정도 생각나게 합니다.
다행히, Form 클래스에서 애초에 field, exclude를 설정해서 어떤 데이터를 주고 받을 지는 설정할 수 있다는 걸 알 수 있었습니다.
추가로 Form 클래스를 template에서 받으면 {{ form.as_p }} 와 같은 형태로 받기 때문에 “어? 이거 프런트 엔드에서 어떻게 조작할 수 있지?” 라는 질문이 떠올랐습니다.
이것도 다행히 CSS를 이용해서 Form 클래스로 받은 form 들도 쉽게 조작 가능한 것을 알게 되었습니다.
기본 Form Class와 Model Form Class 둘 다 사용해보니, Model Form Class가 압도적으로 편리했습니다. 그래도 언젠가는 기본 Form Class가 필요한 순간도 있겠죠?
참고하면 좋은 글
Form의 렌더링 옵션 https://docs.djangoproject.com/en/4.2/topics/forms/#form-rendering-options
Form Widget 공식 문서 https://docs.djangoproject.com/en/4.2/topics/forms/#widgets
model form 공식 문서 https://docs.djangoproject.com/en/4.2/topics/forms/modelforms/#modelform